从iOS8开始,UIAlertView和UIActionSheet将被启用,以后会使用UIAlertController(UIAlertView和UIActionSheet二合一)来到代替它们,从系统层级上统一了 alert 的概念 —— 即以 modal 方式或 popover 方式展示。。本章还是有拾图网温州天时网站制作来跟大家一起分享,UIAlertController的属性和使用方法。
UIAlertController是重UIViewController继承下来,因此是它的子类,而非其先前的方式。所以新的alert可以由view controller 展示相关的配置中获益很多。
UIAlertController在使用alert类型或者action sheet类型展示时,都要给title和message参数来初始化。
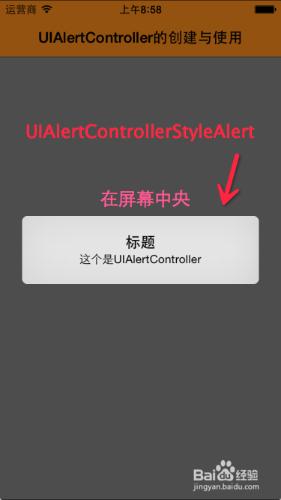
Alert:会以模态形式显示中view controller视图中心;
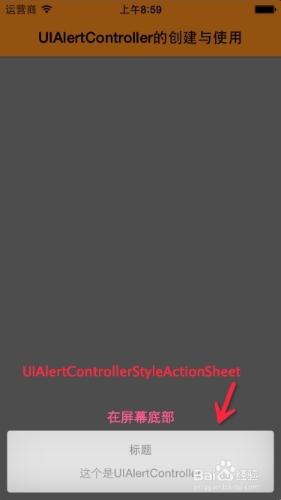
Action sheet: 则会从当前视图的底部滑出。
Alert可以同时有按钮和输入框,action sheet 仅支持按钮。
下面我们通过案例来对比一下,新旧两种创建方式:
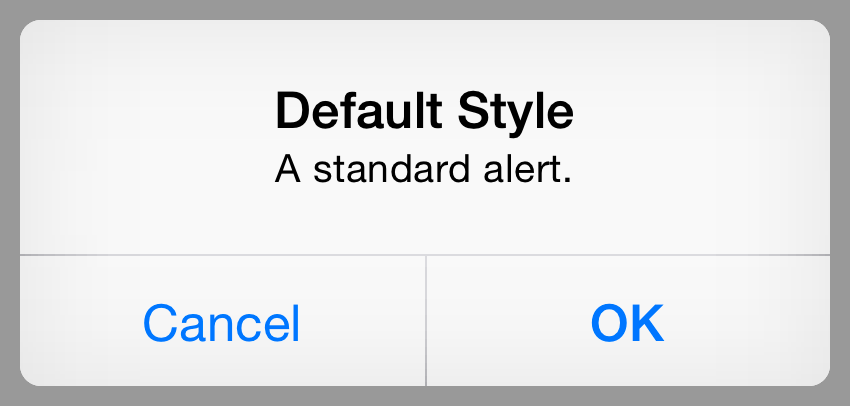
旧方法:UIAlertView(IOS8以前的方式)
UIAlertView *alertView = UIAlertView(title: "Default Style", message: "A standard alert.", delegate: self, cancelButtonTitle: "Cancel", otherButtonTitles: "OK")
alertView.alertViewStyle = .Default
alertView.show()

// MARK: UIAlertViewDelegate
func alertView(alertView: UIAlertView, clickedButtonAtIndex buttonIndex: Int) {
    switch buttonIndex {
        // ...
    }
}
新的创建方法一:
let alertController = UIAlertController(title: "Default Style", message: "A standard alert.", preferredStyle: .Alert)
let cancelAction = UIAlertAction(title: "Cancel", style: .Cancel) { (action) in
    // ...
}
alertController.addAction(cancelAction)
let OKAction = UIAlertAction(title: "OK", style: .Default) { (action) in
    // ...
}
alertController.addAction(OKAction)
self.presentViewController(alertController, animated: true) {
    // ...
}
新的创建方法二(该代码区别于:方法一):
UIAlertController *alert = [UIAlertController alertControllerWithTitle:@"This is Title"
message:@"This is message"
preferredStyle:UIAlertControllerStyleAlert];

[alert addAction:[UIAlertAction actionWithTitle:@"Action 1 (Default Style)"
style:UIAlertActionStyleDefault
handler:^(UIAlertAction *action) {
NSLog(@"Action 1 Handler Called"); }]];

[alert addAction:[UIAlertAction actionWithTitle:@"Action 2 (Cancel Style)"   style:UIAlertActionStyleCancel handler:^(UIAlertAction *action) {                        NSLog(@"Action 2 Handler Called"); }]];

[alert addAction:[UIAlertAction actionWithTitle:@"Action 3 (Destructive Style)"  style:UIAlertActionStyleDestructive   handler:^(UIAlertAction *action) {             NSLog(@"Action 3 Handler Called");  }]];

[alert addTextFieldWithConfigurationHandler:^(UITextField *textField){ UITextField * tf = [[UITextField alloc]initWithFrame:CGRectMake(0, 0, 80, 30)];  }];
[self presentViewController:alert animated:YES completion:nil];
详细创建步骤:
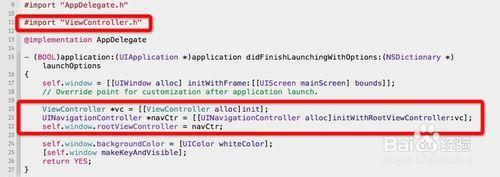
1、创建一个empty(空的)工程项目,新建一个UIViewController;
2、选中工程,右键-New File…选择“Cocoa Touch Class”-Next,给个合理的名称ViewController,再Next完成;
3、在AppDelegate.m文件包含#import "ViewController.h";
4、初始化创建ViewController的视图控制器,并用导航栏控制器包含。将之设置为根视图控制器。
UIAlertController的风格样式设置:
1、首页要创建一个UIAlertController控件;
2、再通过初始化UIAlertController,需要使用alertControllerWithTitle:message:preferredStyle:方法;
3、然后设置参数Title、message 、preferredStyle;
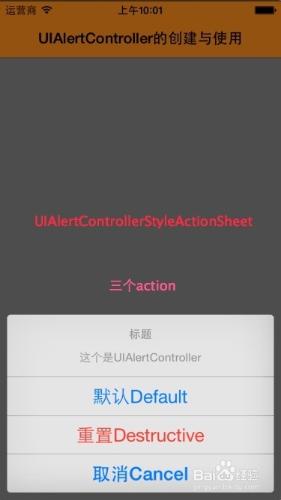
4、preferredStyle有两种风格样式:UIAlertControllerStyleAlert(弹出提示框)和UIAlertControllerStyleActionSheet(从底部弹出选择提示框),是分别代表要代替的UIAlertView和UIActionSheet。

把设置好的UIAlertController显示出来:
1、UIAlertController继承于UIViewController;
2、显示需要使用UIViewController的方法:presentViewController 弹出视图控制器。
[self presentViewController:alertController animated:Yes completion:nil];

给弹出框添加事件响应按钮到UIAlertController上面:
1、通过创建UIAlertAction添加到UIAlertController作为按钮项;
2、UIAlertAction初始化使用方法了:actionWithTitle: style: handler:;
3、给UIAlertAction设置Title、 style、handler参数;
4、最后把UIAlertAction添加UIAlertController。
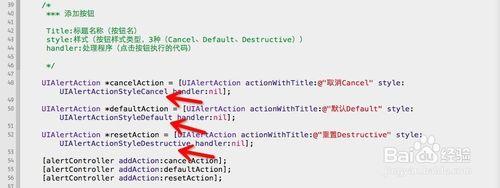

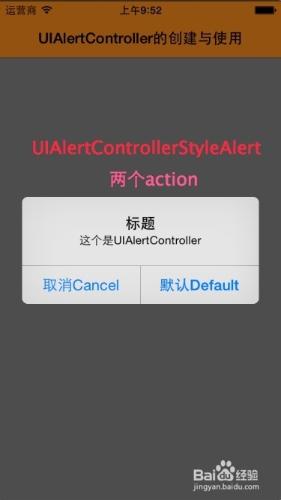
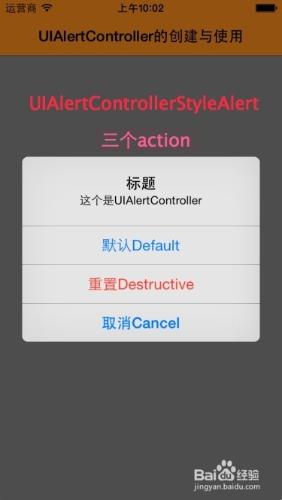
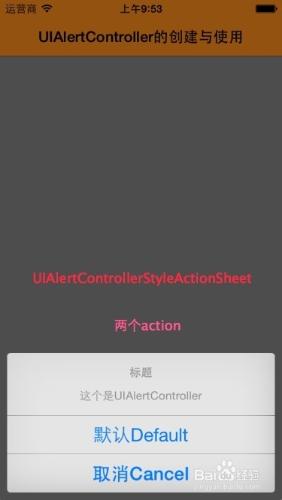
显示两种不同风格的UIAlertController:
1、当UIAlertAction按钮不大于2个时,显示如前两个图;
2、当UIAlertAction按钮大于2个时,显示如后两个图。
注:在苹果上,Cancel按钮在左边/最底部,其他的按添加顺序。
在UIAlertController上添加文本输入框:
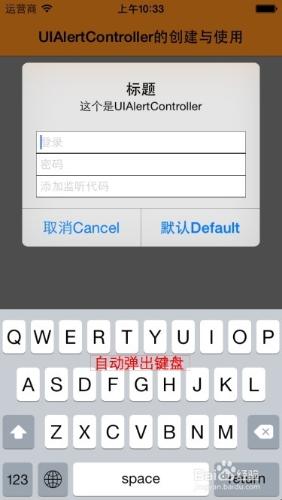
1、只能Alert的风格中添加文本输入框,ActionSheet是不允许的,如果试图向 alert controller 添加带有 .ActionSheet 属性的输入框,将会抛出异常:
Terminating app due to uncaught exception NSInternalInconsistencyException, reason: 'Text fields can only be added to an alert controller of style UIAlertControllerStyleAlert'
2、UIAlertController具有只读属性的textFields数组,需要可直接按自己需要的顺序添加;
3、添加方式是使用block,参数是UITextField;
4、添加UITextField监听方法和实现方法。
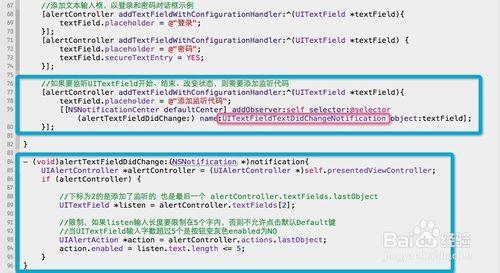
类似代码参考:
//添加文本编辑框
UIAlertController *alertController = [UIAlertController alertControllerWithTitle:@"文本对话框" message:@"登录和密码对话框示例" preferredStyle:UIAlertControllerStyleAlert];
[alertController addTextFieldWithConfigurationHandler:^(UITextField *textField){
    textField.placeholder = @"登录";
}];
[alertController addTextFieldWithConfigurationHandler:^(UITextField *textField) {
    textField.placeholder = @"密码";
    textField.secureTextEntry = YES;
}];
//在“好的”按钮按下时,我们让程序读取文本框中的值,事件响应
UIAlertAction *okAction = [UIAlertAction actionWithTitle:@"好的" style:UIAlertActionStyleDefault handler:^(UIAlertAction *action) {
    UITextField *login = alertController.textFields.firstObject;
    UITextField *password = alertController.textFields.lastObject;
    ...
}];假定我们要让“登录”文本框中至少有3个字符才能激活“好的”按钮。很遗憾的是,在UIAlertController中并没有相应的委托方法,因此我们需要向“登录”文本框中添加一个Observer。Observer模式定义对象间的一对多的依赖关系,当一个对象的状态发生改变时, 所有依赖于它的对象都得到通知并被自动更新。我们可以在构造代码块中添加如下的代码片段来实现。
[alertController addTextFieldWithConfigurationHandler:^(UITextField *textField){
    ...
    [[NSNotificationCenter defaultCenter] addObserver:self selector:@selector(alertTextFieldDidChange:) name:UITextFieldTextDidChangeNotification object:textField];
}];
代码运行效果图
注意:
如果向 alert 或 action sheet 添加一个以上的 .Cancel 按钮将会抛出异常:
Terminating app due to uncaught exception NSInternalInconsistencyException, reason: 'UIAlertController can only have one action with a style of UIAlertActionStyleCancel'
 绿色山茶油金黄色背景设计图[2018-12-06]
 金红色纯芝麻油[2018-12-06]
 绿色科学搭配天然玉米胚芽油[2018-12-06]
 蓝天背景油菜花籽油[2018-12-06]
 绿色金杯特价油[2018-12-06]
 油品如人品[2018-12-06]
 绿色花生油[2018-12-06]
 绿色玉米胚芽油[2018-12-06]